Archive for Juni 2015
Konfigurasi GLUSTERFS Pada CentOS 6.6 ( REPLICATION )
0

Tujuan Dasar:
- Mengetahui konfigurasi GlusterFS
- Mengetahui konfigurasi client GlusterFS
- Memahami konsep kerja GlusterFS
Konsep Dasar:
GlusterFS adalah sebuah aplikasi opensource yang digunakan untuk memanajemen sistem berkas terdistribusi (clusterd filesystem),aplikasi ini pun juga dapat digunakan sebagai media replikasi ruang penyimpanan data. Salah satu keunggulan aplikasi ini dapat memberikan kinerja yang tinggi (high performance) dalam pendayagunaannya.
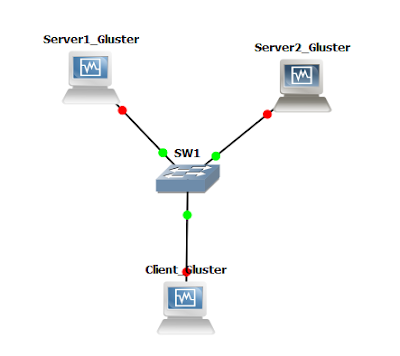
Berikut topologi yang digunakan untuk pembuatan GlusterFS:
Konfigurasi Network
1. Langkah awal, ganti masing-masing hostname pada Server1, Server2, dan juga pada Client dengan
cara: nano /etc/hosts

2. Kemudian tanamkan IP di masing-masing server dan client dengan cara: nano /etc/sysconfig/network-scrypts/ifcfg-eth0
SERVER 1

SERVER 2

CLIENT


19. Kemudian cek Server1 dan Server2, jika berhasil maka file yang dibuat pada client akan otomatis
tersebar di kedua server.
SERVER 1:
ls -l /dist1

SERVER 2 :
ls -l /dist2

Tujuan Dasar:
- Mengetahui konfigurasi GlusterFS
- Mengetahui konfigurasi client GlusterFS
- Memahami konsep kerja GlusterFS
Konsep Dasar:
GlusterFS adalah sebuah aplikasi opensource yang digunakan untuk memanajemen sistem berkas terdistribusi (clusterd filesystem),aplikasi ini pun juga dapat digunakan sebagai media replikasi ruang penyimpanan data. Salah satu keunggulan aplikasi ini dapat memberikan kinerja yang tinggi (high performance) dalam pendayagunaannya.
Berikut topologi yang digunakan untuk pembuatan GlusterFS:

Konfigurasi Network
1. Langkah awal, ganti masing-masing hostname pada Server1, Server2, dan juga pada Client dengan
cara: nano /etc/hosts

SERVER 1


3. Setelah menanamkan IP, jangan lupa untuk merestart network pada masing-masing server dan
client dengan cara:
service network restartclient dengan cara:

4. Kemudian test koneksi antara server dan client. PASTIKAN server dan client terhubung ke
internet. PING dari Server1 ke Server2 dan client.
internet. PING dari Server1 ke Server2 dan client.

REPOSITORI EPEL
5. Kemudian kita lakukan repositori EPEL pada masing-masing server dan client. remote server dan
client menggunakan Putty agar lebih mudah. kemudian masukkan sintaks: wget -P
/etc/yum.repos.dhttp://download.gluster.org/pub/gluster/glusterfs/LATEST/CentOS/glusterfs
-epel.repo
client menggunakan Putty agar lebih mudah. kemudian masukkan sintaks: wget -P
/etc/yum.repos.dhttp://download.gluster.org/pub/gluster/glusterfs/LATEST/CentOS/glusterfs
-epel.repo
SERVER 1:

SERVER 2:

CLIENT :

6. Kemudian edit file glusterfs repo pada masing-masing server dan client dengan cara:
nano /etc/yum.repos.d/glusterfs-epel.repo kemudian ubah base URL nya menjadi: http://download.gluster.org/pub/gluster/glusterfs/LATEST/CentOS/epel-6.6/i686/
SERVER 1 :

SERVER2 :

CLIENT :

7. Kemudian install glusterfs, glusterfs-fuse, dan glusterfs-server pada Server1 dan Server2 dengan
cara:
yum -y install glusterfs glusterfs-fuse glusterfs-server
cara:
yum -y install glusterfs glusterfs-fuse glusterfs-server
SERVER 1 :
SERVER 2 :
8. Setelah menginstall gluster, start gluster pada Server1 dan Server2 dengan cara: etc/init.d/glusterd start chkconfig glusterd on
SERVER 1 :

SERVER 2 :

9. Jika pada server kita menginstall glsuterfs-server, pada client kita hanya menginstall glusterfs dan
glusterfs-fuse saja.
caranya: yum -y install glusterfs glusterfs-fuse
glusterfs-fuse saja.
caranya: yum -y install glusterfs glusterfs-fuse
10. Setelah menginstall gluster di client, buat Trusted Peer Probe di Server1 agar terhubung denagn
server lainnya. Trusted Peer Probe adalah server yang berjalan sebagai server gluster. Trusted
Peer Probe juga bisa digunakan untuk lebih dari 2 server. caranya:
server lainnya. Trusted Peer Probe adalah server yang berjalan sebagai server gluster. Trusted
Peer Probe juga bisa digunakan untuk lebih dari 2 server. caranya:
gluster peer probe server2
11. Kemudian cek peer status apakah Server1 sudah terhubung ke Server2 atau belum. caranya:
gluster peer status
gluster peer status

GLUSTERFS SERVER VOLUME
GlusterFS Server volume ada beberapa macam, tapi kali ini saya hanya memberikan contoh GlusterFS server volume Distibuted. Server jenis ini berguna untuk pendistribusian file yang tersimpan pada server. Tujuannya adalah mempermudah pengambilan file dan mempercepat proses pengunduhan file tanpa terlalu membebani server.
GlusterFS Server volume ada beberapa macam, tapi kali ini saya hanya memberikan contoh GlusterFS server volume Distibuted. Server jenis ini berguna untuk pendistribusian file yang tersimpan pada server. Tujuannya adalah mempermudah pengambilan file dan mempercepat proses pengunduhan file tanpa terlalu membebani server.
12. Langkah pertama, buatlah sebuah direkotori baru pada Server1 dan Server2. contoh:
SERVER 1 :
SERVER 2 :
13. Kemudian buat gluster volume di Server1 dengan cara: gluster volume create dist-volume server1:/dist1 server2:/dist2 force

14. Setelah membuat gluster volume, jalankan gluster volume dengan cara: gluster volume start dist-volume
15. Cek status volumenya apakah berhasil atau tidak dengan cara: gluster volume info

Pengujian Akses Distribusi Volume di Client
16. Buatlah sebuah folder di dalam folder mnt dengan cara: mkdir /mnt/distributed kemudian akses gluster dengan perintah mount: mount.glusterfs server1.centos.com:/dist-volume /mnt/distributed

17. Kemudian edit file /etc/fstab dengan menambahkan text berikut di kolom paling bawah: host1.example.com:/dist-volume /mnt/distributed glusterfs defaults,_netdev 0 0

18. Cobalah membuat beberapa file di client dengan cara:
touch /mnt/distributed/file1
touch /mnt/distributed/file2
touch /mnt/distributed/file3
touch /mnt/distributed/file4
touch /mnt/distributed/file5
touch /mnt/distributed/file6

tersebar di kedua server.
SERVER 1:
ls -l /dist1

ls -l /dist2

TERIMA KASIH!! ^.^
Lab 10 Backup & Restore
0

THE PURPOSE OF THE TEXT :
1. Binary file – file backup berekstensi .backup
– Tidak dapat dibaca
– menciptakan return-point, seperti system restore nya windows yang akan mengembalikan setting ke titik tertentu.
2. Script file – file backup berekstensi .rsc
– berupa scrip yang dapat dibaca dan diedit
– Tidak mengembalikan konfigurasi seperti semula, akan tetapi menambahkan konfigurasi
sesuai yang ada di dalam script.

wlan1 : 192.168.2.135
ether2: 19.19.19.1
CONFIGURATION :
1. Before you doing Backup & Restore, you must config DHCP Client with RouterBoard
using WiFi. First go to Wireless > Security Profiles > clik ( + )

2. Then see the Pre-Shared Key, enter the Pre-Shared key. it means, the password of WiFi.
Then click apply then ok.

3. Next step, go to the interfaces, then click the wlan1, then go to Wireless, change the
mode into station, the security profile is profile1. Then click Scan..

4. In scan window, chose the WIFI then click connect.

5. Then go to IP > DNS, then give check Allow Remote Requests, then click apply - ok.

6. Next step go to IP Firewall, click IP > FIREWALL, then go to NAT and click the ( + ).

7. Change the CHAIN into srcnat.

8. Still in the Firewall, go to Action, then change the action into masquerade. then click
apply - ok.

9. Next step, go to IP DHCP CLIENT int the IP - DHCP CLIENT, click the ( + ) to add the IP
DHCP. In New DHCP Client, change the intreface into wlan1 and the DHCP OPTION
make into hostname and clientid. then click apply - ok.

10. After you click apply, the IP DHCP Client will show out.

11. After that, go into Address List then click the ( + ) to create ether2.

12. To create ether2, give IP Address and Network, then interface change into ether2. Then
click apply - ok.

13. The ether2 will show out in address list.

14. Next open New Terminal, try PING to google.com

15. Next step, go to Files, then click the Backup number 1. Then enter the Name without
password. then click backup number 2.

16. Then the name will show out in file list with the type bakcup.

17. Next step, reset config the RouterBoard. Go to System-Reset Configuration. And
give check the No Default Configuration. then click Reset Configuration.

18. Open again the Winbox, then go to Address list again, it will blank. No list of IP.

19. After that, go to Files again, then click the name of Backup file name, then click Restore
to make your IP back again into Address List.

20. After Restore, open again the Winbox. Then go to Address List again, the IP will show
out because the restore make the file/data back safety again.

21. Same like backup without password, but in Backup. Enter the Name and Password.
Then click Backup.

22. After reboot, open again the Winbox. Click the backup name (number1) then click
restore (number2). it will need password to Restore.

23. Next step, open the New Terminal. Try to
export file = All-Config
ip address export file=IP-Config then reboot the RouterBoard.

24. Next open again the Winbox, then see the File list, then see the All-Config & IP-Config
it was file that export the file.

25. Then IMPORT the file All-Config & IP-Config. with the Sintaks
import file-name=All-Config.rsc

THE PURPOSE OF THE TEXT :
- To know the meaning of Backup & Restore
- To know how to Configure RouterBoard connected to internet
BASIC CONCEPT :
Backup, Create a backup file containing the file system to be stored in case of destruction of the system, so that the software that had previously been backed up can be Restored to the condition before the destroyed/damaged. And the Restore is Refix a broken system using the backup media that had been prepared.
Pada Routerboard terdapat dua jenis backup. Yaitu Binnary backup dan Script backup.
1. Binary file – file backup berekstensi .backup
– Tidak dapat dibaca
– menciptakan return-point, seperti system restore nya windows yang akan mengembalikan setting ke titik tertentu.
2. Script file – file backup berekstensi .rsc
– berupa scrip yang dapat dibaca dan diedit
– Tidak mengembalikan konfigurasi seperti semula, akan tetapi menambahkan konfigurasi
sesuai yang ada di dalam script.
TOPOLOGY :
wlan1 : 192.168.2.135
ether2: 19.19.19.1
CONFIGURATION :
1. Before you doing Backup & Restore, you must config DHCP Client with RouterBoard
using WiFi. First go to Wireless > Security Profiles > clik ( + )

Then click apply then ok.

mode into station, the security profile is profile1. Then click Scan..


apply - ok.

DHCP. In New DHCP Client, change the intreface into wlan1 and the DHCP OPTION
make into hostname and clientid. then click apply - ok.


click apply - ok.


- BACKUP WITHOUT PASSWORD
password. then click backup number 2.


give check the No Default Configuration. then click Reset Configuration.


to make your IP back again into Address List.

out because the restore make the file/data back safety again.

- NOW WE WILL BACKUP WITH PASSWORD
21. Same like backup without password, but in Backup. Enter the Name and Password.
Then click Backup.

restore (number2). it will need password to Restore.

export file = All-Config
ip address export file=IP-Config then reboot the RouterBoard.

it was file that export the file.

import file-name=All-Config.rsc

THANK YOU!! ^.^


