Tampilkan postingan dengan label Rancang Bangun. Tampilkan semua postingan
Lab 10 Backup & Restore
0

THE PURPOSE OF THE TEXT :
1. Binary file – file backup berekstensi .backup
– Tidak dapat dibaca
– menciptakan return-point, seperti system restore nya windows yang akan mengembalikan setting ke titik tertentu.
2. Script file – file backup berekstensi .rsc
– berupa scrip yang dapat dibaca dan diedit
– Tidak mengembalikan konfigurasi seperti semula, akan tetapi menambahkan konfigurasi
sesuai yang ada di dalam script.
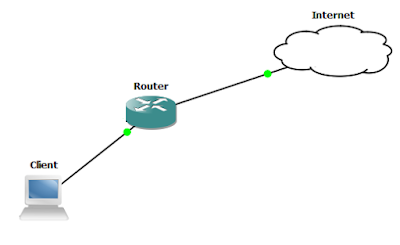
wlan1 : 192.168.2.135
ether2: 19.19.19.1
CONFIGURATION :
1. Before you doing Backup & Restore, you must config DHCP Client with RouterBoard
using WiFi. First go to Wireless > Security Profiles > clik ( + )

2. Then see the Pre-Shared Key, enter the Pre-Shared key. it means, the password of WiFi.
Then click apply then ok.

3. Next step, go to the interfaces, then click the wlan1, then go to Wireless, change the
mode into station, the security profile is profile1. Then click Scan..

4. In scan window, chose the WIFI then click connect.

5. Then go to IP > DNS, then give check Allow Remote Requests, then click apply - ok.

6. Next step go to IP Firewall, click IP > FIREWALL, then go to NAT and click the ( + ).

7. Change the CHAIN into srcnat.

8. Still in the Firewall, go to Action, then change the action into masquerade. then click
apply - ok.

9. Next step, go to IP DHCP CLIENT int the IP - DHCP CLIENT, click the ( + ) to add the IP
DHCP. In New DHCP Client, change the intreface into wlan1 and the DHCP OPTION
make into hostname and clientid. then click apply - ok.

10. After you click apply, the IP DHCP Client will show out.

11. After that, go into Address List then click the ( + ) to create ether2.

12. To create ether2, give IP Address and Network, then interface change into ether2. Then
click apply - ok.

13. The ether2 will show out in address list.

14. Next open New Terminal, try PING to google.com

15. Next step, go to Files, then click the Backup number 1. Then enter the Name without
password. then click backup number 2.

16. Then the name will show out in file list with the type bakcup.

17. Next step, reset config the RouterBoard. Go to System-Reset Configuration. And
give check the No Default Configuration. then click Reset Configuration.

18. Open again the Winbox, then go to Address list again, it will blank. No list of IP.

19. After that, go to Files again, then click the name of Backup file name, then click Restore
to make your IP back again into Address List.

20. After Restore, open again the Winbox. Then go to Address List again, the IP will show
out because the restore make the file/data back safety again.

21. Same like backup without password, but in Backup. Enter the Name and Password.
Then click Backup.

22. After reboot, open again the Winbox. Click the backup name (number1) then click
restore (number2). it will need password to Restore.

23. Next step, open the New Terminal. Try to
export file = All-Config
ip address export file=IP-Config then reboot the RouterBoard.

24. Next open again the Winbox, then see the File list, then see the All-Config & IP-Config
it was file that export the file.

25. Then IMPORT the file All-Config & IP-Config. with the Sintaks
import file-name=All-Config.rsc

THE PURPOSE OF THE TEXT :
- To know the meaning of Backup & Restore
- To know how to Configure RouterBoard connected to internet
BASIC CONCEPT :
Backup, Create a backup file containing the file system to be stored in case of destruction of the system, so that the software that had previously been backed up can be Restored to the condition before the destroyed/damaged. And the Restore is Refix a broken system using the backup media that had been prepared.
Pada Routerboard terdapat dua jenis backup. Yaitu Binnary backup dan Script backup.
1. Binary file – file backup berekstensi .backup
– Tidak dapat dibaca
– menciptakan return-point, seperti system restore nya windows yang akan mengembalikan setting ke titik tertentu.
2. Script file – file backup berekstensi .rsc
– berupa scrip yang dapat dibaca dan diedit
– Tidak mengembalikan konfigurasi seperti semula, akan tetapi menambahkan konfigurasi
sesuai yang ada di dalam script.
TOPOLOGY :
wlan1 : 192.168.2.135
ether2: 19.19.19.1
CONFIGURATION :
1. Before you doing Backup & Restore, you must config DHCP Client with RouterBoard
using WiFi. First go to Wireless > Security Profiles > clik ( + )

Then click apply then ok.

mode into station, the security profile is profile1. Then click Scan..


apply - ok.

DHCP. In New DHCP Client, change the intreface into wlan1 and the DHCP OPTION
make into hostname and clientid. then click apply - ok.


click apply - ok.


- BACKUP WITHOUT PASSWORD
password. then click backup number 2.


give check the No Default Configuration. then click Reset Configuration.


to make your IP back again into Address List.

out because the restore make the file/data back safety again.

- NOW WE WILL BACKUP WITH PASSWORD
21. Same like backup without password, but in Backup. Enter the Name and Password.
Then click Backup.

restore (number2). it will need password to Restore.

export file = All-Config
ip address export file=IP-Config then reboot the RouterBoard.

it was file that export the file.

import file-name=All-Config.rsc

THANK YOU!! ^.^
Lab 9 Conecting To Internet With RouterBoard Mikrotik
0
PURPOSE OF THE TEXT :


PURPOSE OF THE TEXT :
- Knowing How To Configure IP Address On Mikrotik
- Knowing Understanding NAT.
BASIC CONCEPT :
NAT (Network Address Translation) or network address interprestation is a method to connect more than one computer to the internet network using a single IP Address. Many use this method due to the limited availability of IP Addresses, the need for security (security), and the ease and flexibility in network administration.
NAT is a protocol in a network system , NAT allows a network wih IP or Internet protocol that is privaate or private IP that are not registered in the internet network to access the internet.This means that an IP Address can access the internet by using private ip or not using public IP, NAT is usually embedded in a router, NAT is also commonly used "to combine or connect two different networks, and translate ip ip private or public within the internal network into legal network that network so that it has the right to perform access the data in a network.
CONFIGURATION :
1. Step 1, add the IP Address Mikrotik from terminal for ether1 and ether 2. The IP Address of ether1
i use 192.168.1.9/24. Now i will entering IP Address for Ether2. with sinraks :
ip address add address=12.12.12.1/24 interface=ether2
i use 192.168.1.9/24. Now i will entering IP Address for Ether2. with sinraks :
ip address add address=12.12.12.1/24 interface=ether2

2. Next step, you must add the Gateway. with the sintaks :
ip route add gateway=192.168.1.1
ip route add gateway=192.168.1.1

3. After that, you must add the IP DNS Server.with the sintaks :
ip dns set servers=202.43.178.245 allow-remote-requests=yes
ip dns set servers=202.43.178.245 allow-remote-requests=yes

4. Next, add the add the Firewall Nat and take action masquerade. with sintaks :
ip firewall nat add chain=arcnat out-interface=ether1 action= masquerade
ip firewall nat add chain=arcnat out-interface=ether1 action= masquerade

Its function is to map the IP which is not listed on the local network (eth2) and mapped
to the IP Address registered or eth1.
5. After that, try to ping google.co.id/com from mikrotik.

6. Next step open your CMD form Windows, then try to PING to google and try to open website.

THANK YOU!! ^.^
Lab 8 Configuration Interfaces
0
The Purpose Of The Writing :


The Purpose Of The Writing :
- To know what is the meaning of Interfaces
- To know what is the meaning of VLAN
- To know how to switch the Router Port to Switch
Basic Concepts :
VLAN is network model that is not limited to a physical location such as a LAN, this has resulted in a network can be configured Virtual without having to comply with the physical location of equipment. The use of VLAN will make the network setting to be very flexible which can be made segments that depend on the organization or department, without depending on the location of the workstation.
Configuration :
-CHANGE THE INTERFACE NAME
1. First see the name of interfaces by sintaks interface pr.

2. Now change the name with public and local, with the sintaks interface set name=public&local.

3. After change it will displayed the number, ethernet 1 is place 0, and ethernet 2 is place 1.

4. Now, this configuration is how to change interfaces with GUI, first go to interfaces then find the
interfaces would you want to change the name, click apply > OK.
interfaces would you want to change the name, click apply > OK.

- TURN ON AND TURN OFF THE INTERFACE
Turn Off
1. Now, i will turn off the ether3,4,5. To make it off, insert the sintaks interface disable 0,1,2. Then
see the X icon beside the ether, that mean the ether was Off. if you want to make On again, you
just insert the sintaks enable 0,1,2.
see the X icon beside the ether, that mean the ether was Off. if you want to make On again, you
just insert the sintaks enable 0,1,2.

2. Next we must give the comment to the interface, it make easy to see how different who is the local
connection and public connection.
To give comment, use the sintaks interface set name=ether1 comment="ini ke internet"
number=4 and the same step for ether2.
connection and public connection.
To give comment, use the sintaks interface set name=ether1 comment="ini ke internet"
number=4 and the same step for ether2.

3. After you setting, the comment will show up after you see the interface.

- ADD VLAN AND REMOVE VLAN
1. To add VLAN you just insert the sintaks :
interface vlan add name=vlan1 interface=ether2 vlan-id=100
interface vlan add name=vlan2 interface=ether2 vlan-id=200
i add the VLAN into ether2, you can add the VLAN to the other ether.
interface vlan add name=vlan1 interface=ether2 vlan-id=100
interface vlan add name=vlan2 interface=ether2 vlan-id=200
i add the VLAN into ether2, you can add the VLAN to the other ether.

2. If you see in the interface, the vlan1 and vlan2 will be displayed.

3. This is the VLAN after you add in CLI.

4. Now remove again the VLAN with the sintaks :
interface vlan remove vlan1
interface vlan remove vlan2
interface vlan remove vlan1
interface vlan remove vlan2

- CHANGE THE RB INTO SWITCH
1. First check the Unuseable Port and choose the Unuseable port to change into Switch.

2. Now i want change ether3, ether4, ether 5, into the Port place. insert the sintaks like the under step.

3. After you you change the ether3-5, the Port None will change into ether 2.

THANK YOU ^.^
Lab 7 User Login Manajemen
0
Purpose :


The result will not be able to login and it says "Wrong Username or Password"


8080, and the connection type is telnet. Then click Open.


Purpose :
- To know the function of user management on MikroTik.
- To know user management MikroTik
Basic Concepts :
- By default to login to MikroTik, using the admin user and password blank.
to perform user management can be alone in order to be more secure login MikroTik.
In this configuration we will learn
1. Changing the Router Identity
2. User Management
3. Service Management.
Step by Step :
- CHANGING THE ROUTER IDENTITY
1. First open the Winbox, then go to System - Identity .

2. In Identity, change the Router Identity. Then click apply then ok.

3. Next see the top of the Winbox, the name Router Identity will be seen.

- MANAGEMENT USER
1. Login to Mikrotik by admin
then open the Winbox and go to System - User

2. In system user, click the (+) icon to add user, then type your name then apply then ok.

3. Then see the username will be display on the window user. After that you must logout the Winbox.

4. Then open again the Winbox, then click the (...) then see the name Router Identity will be
displayed. click it and then clik connect.
2. You ,ust insert the IP MikroTik on user admin, dobule click at user admin, then enter the Allowed
Address if done, click Apply then Ok.
3. Then you can see the IP at user admin.
.

4. If you done, try to exit h\the Winbox, then try to loggin in using the login IP Client that is not
registered with the admin user on Mikrotik.The result will not be able to login and it says "Wrong Username or Password"

- MANAGEMENT SERVICE
In the management Service, can be used on change the Ports used as port Telnet, SSH etc. But now, i will make Changes to the Telnet port.
1. Login to MikroTik by Winbox, then go to IP - Services.

2. Then double click on Telnet, then change the Port to 8080. then click Apply then ok.

3. Then you can see the port has change into 8080.

4. Try to login MikroTik with Telnet on Client.
Open the Software Putty, input the Host name of IP Address (IP OF MIKROTIK) and the port8080, and the connection type is telnet. Then click Open.

5. After you click open, the Mikrotik in Putty will be open, then login as admin then see your name in
MikroTIK.

THANK YOU


